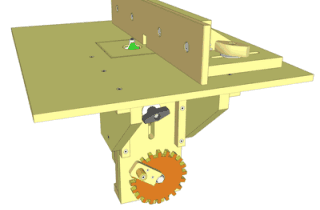
A mortising machine
Horizontal mortising machine (video)
home made horizontal mortising machine.
For more information:
http://www.leaningtreewoodworks.com/
http://www.worldofwoodforum.com/vb/forum.php.
http://www.worldofwoodforum.com/vb/showthread.php?3269-Horizontal-Morticing-M...
==============
http://thewoodwhisperer.com
exact with- dados jig
The secret to making perfect dados with your router!
For a PDF and SketchUp plan of this project, head to
http://thewoodwhisperer.com/exact-width-dado-jig
 In the Weekend Wall Shelfepisode, I showed you how to use a parallel jig to create dados. But the jig was originally created for making coves at the tablesaw. So here’s a special jig made specifically for the purpose of creating dados with your router. The best part is, you can get exact-width dados EVERY TIME!
This jig was developed and demonstrated in the current Guild Build as part of the Wall-Hanging Cabinet series (it was originally inspired by this Wood Magazine Jig). This video is a little sample of what Guild members are enjoying every week during the build season. If you are interested in joining the Guild, learn more here.
This jig can be made to any size for any bit/guide bushing combination. Just remember that once you use a particular bit/bushing combo with the jig, you are stuck with it. Using a different combination will defeat the purpose of the jig. I used a 5/8″ guide bushing and a 1/2″ router bit.
Don’t forget to download the PDF and SketchUp drawing for the Exact Width Dado Jig!
Jig Modifications
I requested ideas modifications to the jig, and a couple Guild members were quick to off suggestions. If you have a modification, upload it to our SketchUp Library and share the link in the comments below.
Denny’s Suggestion
Robert’s Suggestion (SketchUp File)
==================
Router table and fence
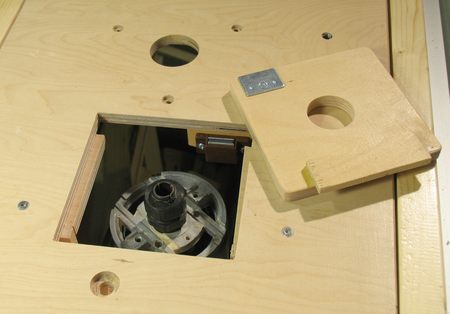
Commercial router tables often have concentric inserts to handle different sizes of router bits. For my router table, I figured concentric inserts would be too hard to make, and that I could just make different inserts with different sizes of holes.
The insert is supported by two ledges screwed to the bottom of the table on the left and right side. To hold the insert down, it has a lip that slips under the table on the near side, and a door magnet on the far side. Before I added the magnet, the air blowing out of the front of the router would often lift the insert out of the table.
For the table surface, I just recycled the piece of plywood that I already had in my router table saw extension. I had previously drilled holes in it to mount two different types of router, so the piece has a few extra holes.
 My first thought was to cut the hole for the insert with a scrollsaw. If I used a fine enough blade, I would get a perfectly matching hole and insert in one go, even if I didn't cut it all straight. But getting the shape right for any additional inserts would be much harder.
So instead, I decided to make the hole exactly square. To make sure I had the sides cut all straight, I cut the sides by making plunge cuts with my table saw.
Plunge cuts can cause dangerous kickback if your work piece is not rigidly secured. I held my work piece by fixing the position of my table saw sled with a small clamp - see bottom left of the picture.
I used my smallest, 6 1/2" blade to make the plunge cuts, so that I could cut relatively deep without making my cuts overly long. I then drilled some holes in the corners to finish the cuts in the corners, and the middle part fell out. I used a carving knife to square out the corners of my cutout.

With both the insert and my router table top made from the same thickness of material, getting the insert to be flush with the table was a simple matter of attaching some pieces of wood to the bottom of the table to act as ledges.
And with my cutout being a 12x12 cm square, making more inserts that fit exactly is straightforward as well.
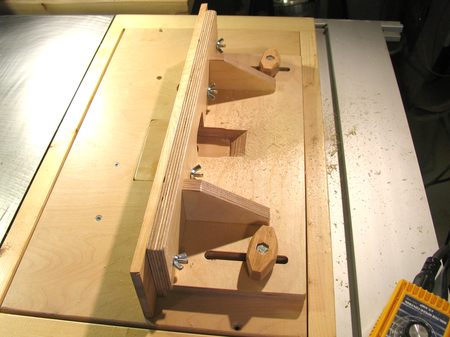
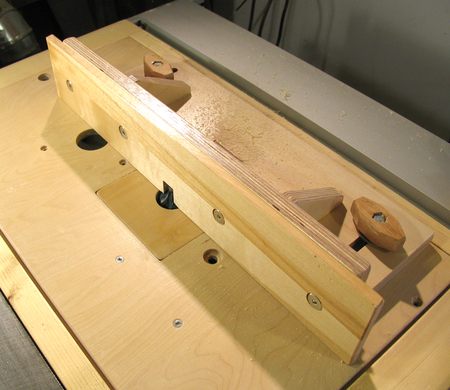 I also built a fence to attach to the top of the router table. I had previously always used my table saw fence to hold a temporary router table fence, but I figured while I was at it, I might as well make a nice fence with a cutout in it for the router bit. My design was inspired by Uli proppe's router fence
The front of the fence is a sacrificial piece of wood. I may replace this with a split fence eventually, but I figure I'll use this one piece fence at least until I end up cutting too much out of this one.
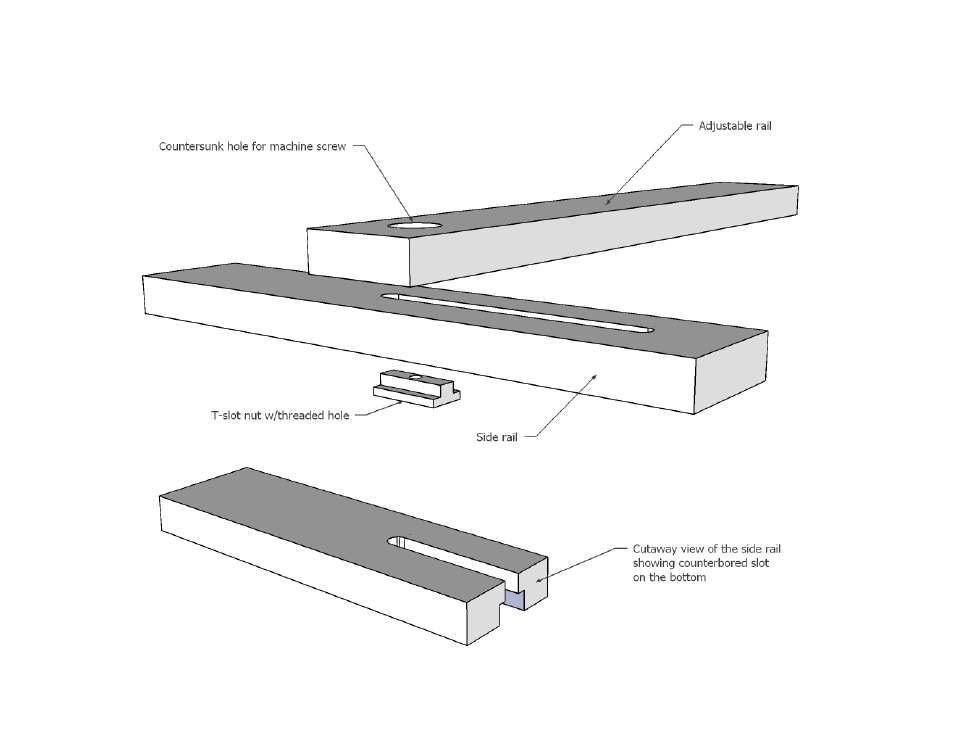
 The fence is held down by two screws, which go into T-nuts on the bottom side of my table. The sacrificial fence is held to the front with some screws held with wing nuts.
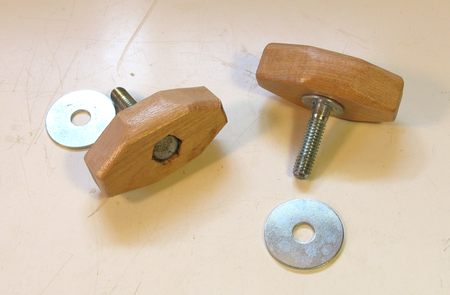 The knobs are just hex bolts mounted in pieces of hardwood. The heads of the bolts are mounted in holes that I chiseled hexagonal to match the screw heads. I also glued a small washer to the bottom of the knobs. A larger washer in turn is used to span the slots that the mounting knobs go through.
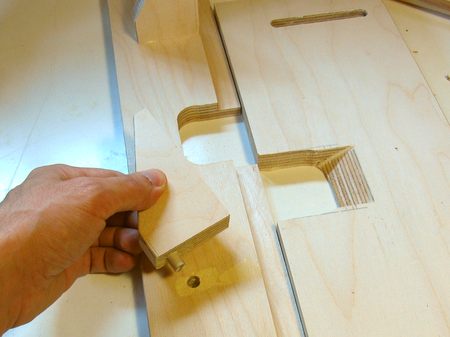 The router fence itself is joined relatively simply. The base is rabbeted into the front side, and the two braces are doweled into the front with just one dowel, and butt joined to the base. I don't expect this fence to get a lot of abuse, so I figure the butt joints should hold.
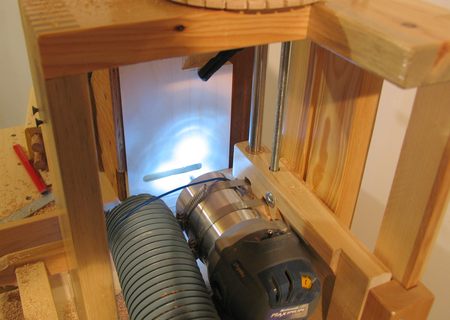 I cut the slots for the knobs with my home-made slot mortising machine. I'm very proud of myslot mortiser and use it every chance that I have!
 The only other slightly tricky aspect of the router fence is the bevel I cut into the base at the back of the cutout for the router. I figured if I beveled it at the back, it would be easier for the router to eject the chips out that way, without them getting stuck. I cut this bevel by passing the cutout slowly side to side across my table saw blade, moving my work piece forward by about a millimeter each time.
I also made a short video of the router lift in action.
Even if you don't want to buy the plans, have a look at the preview of the plans. Even the small drawings of the preview should help you see how it all goes together. |
Back to part 1:Building a router lift
===========================================


No comments:
Post a Comment