http://youtu.be/clJQhjdyK6o
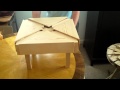
It is the perfect all weather table for the outdoors to
handle all of the elements.
For plans to this project, visit http://craftsman.com/projects
lechada estable multiuso
Precision grout (commercial grade quickrete)
Monday, November 26, 2012

Folding stick chairs
http://youtu.be/dJBtom1FiM4
http://woodworkingtrip.blogspot.com/2012/09/how-to-build-folding-stick-chair....
http://woodworkingtrip.blogspot.com/
Learn how to make this simple but very unique and attractive stick chair that folds! It's made out of 2x4 stock, wire and a few wire clamps! Pretty simple! This is not my design, I just thought people would enjoy seeing just how this unique chair is assembled before they attempt building their own.
========================


Making simple drawers and dividers
http://youtu.be/BMttGC1E3Cs
use stiropor o foam board (High Density)
http://youtu.be/_pTWvPBP6Ps
There are a number of ways in which to build a drawer box, like dovetailing, rabbeting, half- lap, offset tongue and groove etc. each has it's own advantages and disadvantages. Biscuit joinery can easily overcome some of those limitations and yet deliver a sound, usable result.

Plywood cutting table
http://youtu.be/vMmFEfXkeyc
that sits on top of sawhorses, this things makes cutting plywood so much easier.
It is made out of 5/8" plywood and can also be used for an extra work surface with just a sheet of plywood laid on top.
It's easy to build this plywood cutting table, just plywood, glue and brad nails. It is made to sit on top of my Folding Sawhorses which you can find in another of my videos here, http://www.youtube.com/watch?v=_Zr-vdnQiRU. It can be made to fit onjust about any sawhorses you may have without much trouble. It stores easily too, I have two shelving brackets that I got from a remodeling job that I have hung high on a wall and the table just hangs right on them out of the way.The Woodworking Trip at http://woodworkingtrip.blogspot.com/.
Trimming parket with router
http://ezsmart.blogspot.com/
Next I had to rout the flooring so that I can install a 2" border around the slab. For this, I used the EZ Tool Track and the SSRK (Super Smart Router Kit). To keep the track from moving, I could put a screw on each side at the one end since that area would be covered by baseboard and shoe mold.
 The other end was held in place by putting a screw in the side channel
of each side, into a board that was screwed against the wall at one end
and to the temporary wall at the other end.
The other end was held in place by putting a screw in the side channel
of each side, into a board that was screwed against the wall at one end
and to the temporary wall at the other end.
Ready to rout...
 And done, but notice the far end, the router can't get very close to that riser. Time for a different setup.
 Since I didn't have a trim router, I went out and got this Bosch Colt
(since I really like my big Bosch), and made a mounting plate for it to
mount on the SSRK. I made the mounting plate out of 1/4" UHMW and made
it so that it could be mounted
from either of two adjacent sides, giving me the ability to have the
router mounted in the opposite corner and then be able to mount the
whole thing so that the router was on one side or the other. This is
set to do the routing close to that riser.
Since I didn't have a trim router, I went out and got this Bosch Colt
(since I really like my big Bosch), and made a mounting plate for it to
mount on the SSRK. I made the mounting plate out of 1/4" UHMW and made
it so that it could be mounted
from either of two adjacent sides, giving me the ability to have the
router mounted in the opposite corner and then be able to mount the
whole thing so that the router was on one side or the other. This is
set to do the routing close to that riser.
 Here the router base is mounted on the other side so I can do the other end of the opening, up next to the fireplace.
 I then used my Dremel Multi-tool to saw that last little bit, most of
which will be covered with baseboard and shoe mold, but needed to go to
allow the trim to be easily placed.
I then used my Dremel Multi-tool to saw that last little bit, most of
which will be covered with baseboard and shoe mold, but needed to go to
allow the trim to be easily placed.
Next I had to rout the flooring so that I can install a 2" border around the slab. For this, I used the EZ Tool Track and the SSRK (Super Smart Router Kit). To keep the track from moving, I could put a screw on each side at the one end since that area would be covered by baseboard and shoe mold.


Ready to rout...


Mobile clamp stand
http://chiefsshop.wordpress.com/category/plan-of-the-week/
Large, small, locking – a wide variety of clamps can be stored in and on it. Casters on the bottom make it perfect for keeping clamps close at hand.
My usual tool suspects are needed to complete it – table saw or circular saw, miter saw, jig saw, drill driver, and Kreg Jig.
Click the image below to download the plan.
Clamp Stand in my shop
An indoor bench
youtu.be/fV4WECYMX3s
http://chiefsshop.wordpress.com/2010/06/15/simple-woodworking-bench-video/
The instructions: ChiefsShopSimpleBench.pdf
list of lumber you’ll need:
Four 1 x 4 x 6 poplar boards
One 1 x 4 x 2 poplar board
Two 2 x 2 x 3 poplar boards
One 1/4 x 3 x 2 poplar board
The instructions: ChiefsShopSimpleBench.pdf
list of lumber you’ll need:
Four 1 x 4 x 6 poplar boards
One 1 x 4 x 2 poplar board
Two 2 x 2 x 3 poplar boards
One 1/4 x 3 x 2 poplar board
Other projects are available at http://chiefsshop.wordpress.com/category/plan-of-the-week/.
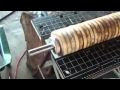
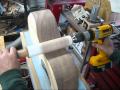
Thickness Sander
Shop Built Sander
Thickness Sander
Your website article says the motor RPM is 1750 with 2" pulley on the motor and 5" on the drum. Am I calculating the RPM of the drum correctly? 1750 x 2/5 for a drum RPM of 700? With a 5" drum, surface FPM would be 700 x (5 x 3.14) then divide by 12 for ~915 FPM surface speed. This seems slower than commercial drum sanders (which really means nothing)
How to use a Delta drum sander


Loose tenons -Ensamble con espaldón suelto
Entalladura de espaldón y mortaja
Ensambladura de caja y espiga
http://youtu.be/zORuOdjasMo
The mortise-and-tenon joint is the true workhorse of solid wood woodworking. Loose or floating tenons are a remarkably useful variation on the traditional mortise-and-tenon.
Learn more about the mortising block and the techniques used in this video at:
http://woodworkersjournal.com/Main/Articles/Skill_Builder_Loose_Tenon_Joinery
Learn more about Woodworker's Journal at their website:
http://woodworkersjournal.com
==========================
LooseTenon Joinery
Rout 4 variations of these super-strong joints with a versatile shop made jig.
By Bill Hylton|
I've used a number of different
methods to create mortise and tenon
joints, but I keep coming back to loose
tenons, because they're easy, strong
and versatile. Instead of cutting a
tenon on one part and a mortise in
the other, I rout identical mortises in
both parts, and connect them with a
fitted strip of wood—a loose tenon.
Loose tenon joinery is perfect for casework,
tables and doors of all sizes.
The only tools you need to start making loose tenon joints are a plunge router equipped with an edge guide, straight bits designed for plunge cutting and a mortising block—a shopmade jig I've designed that you can make in a day.The mortising block minimizes layout work and allows routing both edge and end mortises from the same router setup. You can use off-the-shelf bits and just about any plunge router, but a precision edge guide is a must. I use the Micro-Fence edge guide, which I think is the best available (see Sources, below). The mortising blockThis jig holds the workpiece, supports the router and controls its movement (Fig. A, below).The jig consists of the mortising block itself, a top extension, an L-bracket and a clamp board for bench mounting.The face of the block has dadoes and mounting-bolt holes for the two work holders—horizontal for edge mortising and vertical for end mortising. The router sits on top of the block and overhangs the workpiece.The router's edge guide is housed in a track formed by the L-bracket (Photo, opposite). Adjustable stop blocks set the mortise length. How the jig works• The jig's registration line locates the workpiece.• The jig's L-bracket tracks the router and keeps the mortise aligned with the edges of the workpiece. • The mortise's width is determined by the bit's diameter.To create mortises wider than the bit, you reposition the fence and make a second pass. • The mortise's depth is controlled by the router's plunge mechanism. • The mortise's length is governed by the jig's adjustable stop blocks. • The mortise's lateral (side-to-side) positioning is controlled by the router's edge guide. Build the jig1.Mill stock for the main parts and cut the pieces to final dimensions (Fig. B, below).The mortise block's body and the horizontal work holder must be exactly the same length, because you reference from the ends to rout the vertical keyways.2. Rout 1/4" deep vertical keyways in the mortising block and the horizontal work holder. 3. Rout single 1/4" deep horizontal keyways in the mortising block and the vertical work holder.The block’s keyhole is stopped. 4. Rout mounting-bolt slots in each work holder, using a plunge router and an edge guide. 5. Plane 1/2" thick stock to fit the work holder keyways. Cut pieces to length to create the keys. Attach them. 6. Clamp the horizontal work holder to the mortising block.Tap a 1/2" brad point drill at both ends of each slot to transfer its location to the block. Remove the work holder and scribe vertical lines on the block through the four points you marked. Clamp on the vertical work holder, mark the slots and scribe a pair of horizontal lines. 7.Drill holes for the work holder mounting bolts at the four points where the horizontal and vertical lines intersect.To secure the 3/8" bolts, I cut threads in the wood itself.To do this, drill the four holes with a 5/16" bit and use a 3/8"-16 tpi tap to cut the threads (see Sources).No cutting fluid is needed; just turn the tap into the hole, then back it out. Alternatively, you can use Tnuts or drive threaded inserts into the body to secure the bolts. 8.Glue and clamp the top extension to the mortising block. Clean off any dried glue after removing the clamps. Then joint the assembly to ensure that its top surface is square to the face. 9. Attach a 3/8" thick wood fence to your router's edge guide.Then size the L-bracket parts to create a groove that will house the fence.The fit should be snug, so the fence slides without any wobble.Glue the L-bracket parts together and install them. 10.Make both stop blocks from one long piece of 5/8" by 2-3/4" stock. Rout the 1/4" deep keyway and two mounting bolt slots. Cut the stops to final length.Make keys and attach them. 11. Rout matching keyways in the top of the mortising block. 12. Set the stops in place on the block and mark locations for mounting bolt holes.Drill and tap the holes for 1/4"-20 tpi bolts. 13. Install toggle clamps on the work holders (see Sources). I installed longer threaded spindles on all the clamps and used a 500-lb.size on the vertical work holder. Be sure to mount the clamps so they don't interfere with the router. 14.Draw a registration line centered on the face and top of the mortising block. 15.Glue on the clamp block. Create the basic loose tenon joint1. Lay out an edge mortise (Photo 1). It doesn't have to be elaborate, just lines marking the mortise ends and centerline. Only one line is essential: a centerline across the mortise. This mark aligns with the jig's registration line.2.Position a test piece on the jig, using the horizontal work holder (Photo 2). 3.Adjust the work holder so the edge of the workpiece is flush with the jig's top. Line up the workpiece centerline with the block's registration line (Photo 3).Adjust the toggle clamps to hold the work securely. 4. Install a bit designed for mortising in the router.Up-spiral bits are popular these plunge cuts, but they're not essential. 5. Install the router on the jig and test-slide the edge guide's wood fence in the L-bracket groove. Apply wax, if necessary. 6. Bottom the bit onto the workpiece. Then move the router to center the bit on the mortise centerline (Photo 4). Lock down the edge guide and set the plunge depth. 7. Install the stop blocks to establish the length of the mortise (Photo 5). 8. Rout the mortise (Photo 6). That's all it takes. As long as the faces of the workpieces are oriented the same way on the jig, all the edge mortises routed with this setup will be the same, regardless of where they fall on the workpiece. Just scribe a centerline across each mortise, and align it with the registration line on the block (Photo 7). If all of the mortises are located in the same place on each workpiece, you don’t even have to mark them. Instead, just fasten a stop on the jig against the end of your test piece and use it to register the workpieces. 9.The only change you have to make to rout the matching end mortises is to switch work holders (Photos 8 and 9). 10.Mill loose tenon stock to complete the joint. First, plane a length of stock to fit the mortises. It should slip in without wiggling or binding. Rip the blank to width, slightly less than the mortises’ length.Next, round the blank’s edges to match the mortises. Then cut individual loose tenons from the blank. Reinforce a cope and stick jointRouted cope and stick joints look great, but their stub tenon construction may not be suitable for large cabinet doors. Adding loose tenons strengthens these joints.Rout the mortises before you rout the cope and stick profiles, so you don't have to work around stub tenons on the ends of the rails. (The mortises won't interfere when you rout the profiles.) Center the mortises across the thickness of the workpiece.They probably won’t align with the stub tenons produced by the cope cuts, but that doesn’t matter, because everything will be hidden in the assembled joint. Start with the end mortises.Offset them away from the rails' inner edges, so the panel groove won't cut into the mortises (Photos 12, 13 and 14). Locate the edge mortises in the stiles according to the rails' offset end mortises. Be mindful of the rails' offset mortises when you rout the profile and panel grooves. It's all too easy to rout the wrong edge. Twin mortise jointsIn post-and-rail constructions made using thick stock, you can make stronger joints by doubling the loose tenons.The inside mortises on the posts of these corner joints will intersect, so they must be shorter; their tenons are mitered.The outside post mortises are deeper, so their tenons can be longer.The rail mortises can all be the same depth.Orient the workpieces with their outside faces against the mortising block. Set up and rout the outside mortises.You'll have to change work holders when you switch from routing edge to end mortises. Reposition the bit and rout the inside mortises (Photo 15). Reduce the final plunge depth when you rout these mortises in the posts. Loose tenon table jointIn this construction, the apron usually is inset from the leg faces.My approach is to set up for the mortises in the legs (Photos 16 and 17).To rout the aprons, I use double-faced tape to install a shim equal in thickness to the inset between the apron and the block (Photo 18).Be sure to install the aprons outside-face-in before routing their mortises.Sources(Note: Product availability and costs are subject to change since original publication date.)Micro Fence, microfence.com, 800-480-6427, Micro Fence Edge Guide. Buy Destaco, buydestaco.com, 800-560-9292, De-Sta-Co Horizontal Toggle Clamps, #215U; #225U (500 lb. cap.). Tap and Die sets are available at hardware stores and home centers. Fig. A: Loose Tenon Mortising Jig Despite their name, loose tenon joints fit as precisely as traditional mortise and tenon joints, and are just as strong. Fig. B: DimensionsMortising Block Stop Block Horizontal Work Holder Vertical Work Holder |
Click any image to view a larger version. Adapt your router to the jig by installing a fence on the edge guide that fits the slot formed by the jig's L-bracket.This keeps the bit aligned as the router slides back and forth. To move the bit laterally, you simply adjust the edge guide. The Basic Loose Tenon Joint  1. Lay out one edge mortise on a test piece to set up the router and jig.The mortise centerline is used for positioning the workpiece on the mortising block—it's the only layout mark required for every mortise.  2. Set up the jig to rout the edge mortises. Install the horizontal work holder and position the test workpiece so its edge is flush with the top of the jig.Then tighten the bolts.  3. Align the work's mortise centerline with the jig's registration line.Then lock the test piece in position.  4. Install the router and adjust the edge guide to center the bit on the work.Then adjust the router's plunge-depth stop to the desired mortise depth.  5. Install the stop blocks. Move the router to one end of the mortise and align the bit's edge with the layout mark. Slide the stop against the router and tighten the bolt. Set the second stop the same way.  6. Rout the mortise with a series of shallow cuts. Plunge the bit about 1/8", feed quickly to the far stop, retract the bit, return to the starting position and go again.  7. Mark your stocks' outside faces and always orient the same face against the mortising block when you rout. Once all the edge mortises are routed, switch to the vertical work holder to rout the end mortises.  8. To mount the vertical holder, clamp a workpiece with its mortise centerline aligned with the jig's registration line. Slide the holder against the workpiece and tighten the bolts.  9. Install the router and rout the end mortise. The length, width, depth and placement of the mortise don't change when you switch work holders.  10. Size a loose tenon blank. Plane a length of stock to fit the mortises. It should slip in without wiggling or binding. Rip the blank to width, slightly less than the mortises' length.  11. Round the tenon blank's edges to match the mortises.Then use a crosscut sled to cut individual loose tenons from the blank. Reinforce a Cope and Stick Joint  12. This variation requires offsetting the rail mortises, so they don't interfere with the panel groove. Lay out the offset mortise on a pre-routed rail.Then use this rail to position the vertical work holder.  13. Rout the mortises before you rout the cope and stick profiles.Your initial set-up positions the mortise in only one end of each rail, because both ends of the rail must be routed with the same face against the block.  14. To position the mortise in the other end, install a shim equal to the panel groove's depth between the work stop and the rail. Twin Mortise Joints  15. Rout twin mortises in two steps. Lay out and rout the first mortises in both the edges and ends. Reposition the bit for the second mortises and go again. Always orient the same face against the fence. Table Joint  16. With table joints, the aprons are usually inset from the legs.Start by mortising the legs. Clamp the leg with its outside faces against the block and the work-holder.Position the bit, set the stops and rout the mortise.  17. Flip and rotate the leg to rout the second mortise. It doesn't matter that the leg now extends in the opposite direction, because the mortises are centered on the jig's registration line.  18. To inset the aprons from the legs, you offset their mortises by the amount of the inset. Attaching a shim of the desired thickness to the jig automatically offsets the mortise correctly. |
Filed under: Projects, Project, Joinery, AWE
Attachment:
LooseTenon_lead.jpg
Wednesday, November 14, 2012
Ramin
abc.net.au/4corners/content/2002/timber_mafia/resources/resources_ramin
Ramin (Gonystylus spp.) is a tropical hardwood tree species, occurring in peat swamp and lowland freshwater swamp forest in Borneo, Sumatra and Peninsular Malaysia. As a swamp species ramin is prone to over-exploitation and cannot be cultivated on plantations. In Kalimantan some of the last stands of ramin trees exist in protected and conservation areas such as Tanjung Puting National Park, around the Sebangau River, Lake Sentarum National Park, Gunung Palung Nature Reserve, Mandor Nature Reserve, Muasra Kaman Nature Reserve, Gunung Penrisen/Gunung Nyiut Game Reserve and Pleihari Martapura Wildlife Reserve. Ramin has run out within most forest concession areas and is classified as a vulnerable tree species by the World Conservation Union (a status applied to species facing a high-risk of extinction in the wild in the medium-term). Those who benefit from the sale of this valuable species log within these protected areas, including national parks or expired concessions. Ramin is a valuable light hardwood species and is the most valuable tree species found in Indonesia. It is widely used for furniture, picture frames, futons, snooker cues and so on.
Ramin commands some of the highest prices per cubic metre paid for timber from South-East Asia. Those who log ramin in Tanjung Puting National Park receive about US$2.20 per m3, by the time this wood reaches consumers in the USA, Italy, Japan and the UK the cost is US$1000 per m3. The international demand for the wood has had devastating effects on the forests in Indonesia. In 2001 the then Coordinating Minister for the Economy in Indonesia, Rizal Ramli, commented that "the illegal logging of ramin has sharply increased in line with the increasing price of it on the international market".
 Ramin
has been a target for illegal loggers since the early 1990s with
illegal cutting soaring in recent years as civil order and law
enforcement has eroded. The former Minister of Forests in Indonesia,
Marzuki Usman took the first action to curb the logging within Tanjung
Putting by issuing a Ministerial decree to place a temporary moratorium
on the cutting and trading of ramin in April 2001. In August 2001,
Indonesia placed ramin on Appendix III of the Convention on International Trade in Endangered Species
(CITES) with a zero quota, to seek international support for their
actions. The Ministry of Forestry in Indonesia has awarded low cutting
allowances to try and combat the problem of over-exploitation. However
ramin is still cut and exported illegally.
Ramin
has been a target for illegal loggers since the early 1990s with
illegal cutting soaring in recent years as civil order and law
enforcement has eroded. The former Minister of Forests in Indonesia,
Marzuki Usman took the first action to curb the logging within Tanjung
Putting by issuing a Ministerial decree to place a temporary moratorium
on the cutting and trading of ramin in April 2001. In August 2001,
Indonesia placed ramin on Appendix III of the Convention on International Trade in Endangered Species
(CITES) with a zero quota, to seek international support for their
actions. The Ministry of Forestry in Indonesia has awarded low cutting
allowances to try and combat the problem of over-exploitation. However
ramin is still cut and exported illegally.
Ramin distribution is restricted to Indonesia and Malaysia but is becoming increasingly scarce in Malaysia. Malaysia is a crucial pivot in the international trade in illegal ramin. As the country's own supplies have been over-exploited and fallen dramatically, its industry has moved to secure fresh sources by exploiting the situation in Indonesia. In Indonesia 90 % of ramin production is exported. Analysis of production data for recent years reveals a huge discrepancy between the legal production of ramin in Indonesia and the amount processed and exported by the timber industry and brokers. The figures read as such; in 2000 Peninsular Malaysia exported 39,644 m3 of ramin sawntimber, in 2001 Peninisular Malaysia exported 39,793 m3 of ramin sawntimber. From figures released so far in 2002 it appears exports have not dropped off significantly since last year. Indonesia has recorded no legal exports of ramin logs or sawntimber to Malaysia from 2000 to the present. Thus all these exports have originated in Malaysia, which means Peninsular Malaysia would have had to produce 80,000m3 of ramin logs in 2000 and again in 2001. However, Peninsular Malaysia has virtually no swamp left and in recent years they have produced only an estimated 80-90,000 m3 of ramin as a whole.
See an interactive map showing how ramin enters Malaysia.
http://www.kew.org/plants/ramin.html
Gonystylus species
Ramin is the common trade name given to a number of light coloured tropical hardwood tree species native to the peat swamp forests of Brunei Darussalam, Fiji, Indonesia (Kalimantan and Sumatra), Malaysia (Peninsular Malaysia, Sabah, Sarawak), Singapore, Solomon Islands and The Philippines. Ramin wood is prized for its fine grain and easy working qualities and the main products in trade are picture frames, pool cues, blinds, tool handles and decorative mouldings. The major importing countries are China, USA and Italy.
Concern has arisen about the over-exploitation of ramin, particularly from
prime orang-utan habitats and Protected Reserves
in Southeast Asia . Ramin is now listed under the Convention
on International Trade in Endangered Species (CITES), which
regulates the international trade in species threatened through
trade. This means that a permit is needed to import certain
parts and derivatives of ramin into the UK. The Royal Botanic
Gardens, Kew has been designated as the UK CITES Scientific
Authority for plants. As such, its role
is to provide scientific advice to the UK government on plants
in trade and assist enforcement agencies, such as HM Revenue
and Customs, to implement CITES not only within the UK,
but at the European and international level.
Find out more
 Kew's
scientists use high-powered microscopes to identify ramin, based on its
unique wood anatomy
Kew's
scientists use high-powered microscopes to identify ramin, based on its
unique wood anatomy
Search
Kew's electronic Plant Information Centre for scientific
information about Gonystylus species
External links
 CITES
Secretariat
CITES
Secretariat
CITES
webpage (maintained by the Defra, Kew and JNCC)
Illegal
Logging information (maintained by the Sustainable
Development Programme of Chatham House)
European
Wildlife Trade Regulations (these
implement CITES within the 25 member States of the EU)
Ramin (Gonystylus spp.) is a tropical hardwood tree species, occurring in peat swamp and lowland freshwater swamp forest in Borneo, Sumatra and Peninsular Malaysia. As a swamp species ramin is prone to over-exploitation and cannot be cultivated on plantations. In Kalimantan some of the last stands of ramin trees exist in protected and conservation areas such as Tanjung Puting National Park, around the Sebangau River, Lake Sentarum National Park, Gunung Palung Nature Reserve, Mandor Nature Reserve, Muasra Kaman Nature Reserve, Gunung Penrisen/Gunung Nyiut Game Reserve and Pleihari Martapura Wildlife Reserve. Ramin has run out within most forest concession areas and is classified as a vulnerable tree species by the World Conservation Union (a status applied to species facing a high-risk of extinction in the wild in the medium-term). Those who benefit from the sale of this valuable species log within these protected areas, including national parks or expired concessions. Ramin is a valuable light hardwood species and is the most valuable tree species found in Indonesia. It is widely used for furniture, picture frames, futons, snooker cues and so on.
Ramin commands some of the highest prices per cubic metre paid for timber from South-East Asia. Those who log ramin in Tanjung Puting National Park receive about US$2.20 per m3, by the time this wood reaches consumers in the USA, Italy, Japan and the UK the cost is US$1000 per m3. The international demand for the wood has had devastating effects on the forests in Indonesia. In 2001 the then Coordinating Minister for the Economy in Indonesia, Rizal Ramli, commented that "the illegal logging of ramin has sharply increased in line with the increasing price of it on the international market".
Ramin
has been a target for illegal loggers since the early 1990s with
illegal cutting soaring in recent years as civil order and law
enforcement has eroded. The former Minister of Forests in Indonesia,
Marzuki Usman took the first action to curb the logging within Tanjung
Putting by issuing a Ministerial decree to place a temporary moratorium
on the cutting and trading of ramin in April 2001. In August 2001,
Indonesia placed ramin on Appendix III of the Convention on International Trade in Endangered Species
(CITES) with a zero quota, to seek international support for their
actions. The Ministry of Forestry in Indonesia has awarded low cutting
allowances to try and combat the problem of over-exploitation. However
ramin is still cut and exported illegally. Ramin distribution is restricted to Indonesia and Malaysia but is becoming increasingly scarce in Malaysia. Malaysia is a crucial pivot in the international trade in illegal ramin. As the country's own supplies have been over-exploited and fallen dramatically, its industry has moved to secure fresh sources by exploiting the situation in Indonesia. In Indonesia 90 % of ramin production is exported. Analysis of production data for recent years reveals a huge discrepancy between the legal production of ramin in Indonesia and the amount processed and exported by the timber industry and brokers. The figures read as such; in 2000 Peninsular Malaysia exported 39,644 m3 of ramin sawntimber, in 2001 Peninisular Malaysia exported 39,793 m3 of ramin sawntimber. From figures released so far in 2002 it appears exports have not dropped off significantly since last year. Indonesia has recorded no legal exports of ramin logs or sawntimber to Malaysia from 2000 to the present. Thus all these exports have originated in Malaysia, which means Peninsular Malaysia would have had to produce 80,000m3 of ramin logs in 2000 and again in 2001. However, Peninsular Malaysia has virtually no swamp left and in recent years they have produced only an estimated 80-90,000 m3 of ramin as a whole.
See an interactive map showing how ramin enters Malaysia.
Sources:
- Timber Trafficking (PDF file)
- Illegal Logging in Indonesia, South East Asia and International Consumption of Illegally Sourced Timber - Environmental Investigation Agency/Telapak
http://www.kew.org/plants/ramin.html
Gonystylus species
Ramin is the common trade name given to a number of light coloured tropical hardwood tree species native to the peat swamp forests of Brunei Darussalam, Fiji, Indonesia (Kalimantan and Sumatra), Malaysia (Peninsular Malaysia, Sabah, Sarawak), Singapore, Solomon Islands and The Philippines. Ramin wood is prized for its fine grain and easy working qualities and the main products in trade are picture frames, pool cues, blinds, tool handles and decorative mouldings. The major importing countries are China, USA and Italy.
Find out more
External links
Subscribe to:
Comments (Atom)